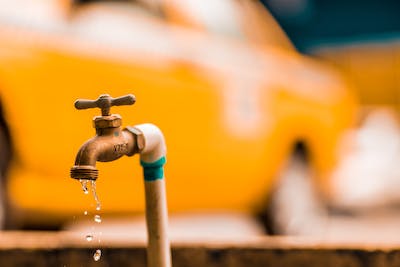
Plumbing 101: How To Fix A Low Water Pressure
Plumbing problems can be a real headache. Whether it's a clogged drain or low water pressure, plumbing issues can cause stress and frustration. The good news is that most plumbing problems can be fixed with the right tools and knowledge. In this article, we'll cover Plumbing 101: How to fix a Low Water Pressure.
We'll go over what causes low water pressure and how to diagnose the problem in order to properly fix it. If you're dealing with low water pressure in your home and want to try fixing it yourself, then this article is for you! We'll walk you through some of the most common fixes and provide helpful tips along the way.
So if you're ready to tackle your low water pressure problem, let's dive right in! With the right approach and knowledge, you can get your home's water flowing back at full force in no time.
1. Identifying Low Water Pressure
I'm sure we've all experienced those moments where our showers are barely trickling, or worse yet, not coming out at all. It's a huge bummer and can be really inconvenient. But don't worry! Fixing low water pressure isn't too difficult. First, let's identify what exactly low water pressure is.
Low water pressure is when the flow of your water from your faucets and showers is dramatically reduced or stopped altogether. This can be due to a few different things such as clogged pipes, faulty plumbing fixtures, or a malfunctioning pressure regulator. It could also be caused by something as simple as a shut off valve that was closed unintentionally. If you have multiple faucets with low water pressure it usually means it's an issue with the main line and not just one particular fixture.
So now that you know what causes low water pressure and how to identify it, you're ready to start fixing the problem! There are many different methods for fixing low water pressure depending on the cause of the issue so it's important to make sure you know what's going on before attempting any kind of repair. You may need to check valves, pipes, and fittings in order to make sure everything is working correctly before trying any repairs yourself. If you don't feel comfortable doing this yourself then you should call a professional plumber who can help get your water flowing again in no time!
2. Diagnosing The Cause Of Low Water Pressure
Have you ever experienced a sudden decrease in water pressure while trying to take a shower? It's definitely an annoyance, but it could be an indication of something more serious. In this section, we'll explore the steps necessary for diagnosing the cause of low water pressure.
To begin with, it's important to determine whether the issue is affecting all outlets or just one specific fixture. If there are multiple fixtures affected, then the problem is likely due to a blockage in your main line. However, if it's just a single fixture that seems to have lower pressure than usual, then the problem is likely confined to that particular unit.
The next step is to check any connections between your pipes and faucets. Make sure that all valves are open and functioning properly - if any are closed or partially closed, it may be causing an obstruction in your water flow. Additionally, inspect any joints between your pipes for signs of corrosion or leaking - these issues can also lead to decreased water pressure.
Once these preliminary checks have been completed, you may need to call a professional plumber if the problem persists. They will be able to identify more complex issues such as faulty valve systems or broken pipes that require specialized tools and expertise for repair. Taking these preventative steps now can save you from bigger problems down the road!
3. Checking For Leaks
Getting to the root of why your water pressure is low can be a tricky business! The good news is that we're one step closer to figuring out what could be causing the issue. This time, let's take a look at what kind of leaks there might be in your plumbing system.
Leaks can often be the hidden culprit behind low water pressure. To get to the bottom of it, you'll need to start by checking if any of your pipes are leaking. It may sound like looking for a needle in a haystack, but with a bit of patience and some detective work, you should be able to locate any potential problem areas.
To do this, take a look around each pipe joint and inspect them closely for any signs of damage or corrosion. If you spot any leaks, make sure you mark them off so you know where they are when it comes time to repair them later on. You may also want to check for any loose fittings or connections as well – these can cause leaks too and should also be addressed appropriately.
So don't let those pesky leaks fool ya! With some vigilance and attention to detail, you'll be well on your way to getting that water pressure back up where it needs to be. Now all that's left is fixing the issue and restoring your plumbing system back into shape!
4. Cleaning The Aerator
Eager to get that water pressure back up? Well, you’re in luck. The fourth thing to do when addressing low water pressure is to clean the aerator. Don’t worry if you’ve never heard of an aerator before – it’s a small device located at the end of your faucet and its purpose is to mix air with the water flow for better performance.
Now, this little gadget can easily become clogged with debris over time, so it needs regular cleaning in order to keep things running smoothly. Fortunately, it’s a pretty simple process; all you need is some warm water and vinegar and you’ll be good to go. Start by unscrewing the aerator from your faucet and letting it soak in a cup filled with half warm water and half vinegar solution. After about 15 minutes, take a toothbrush or small brush and give it a gentle scrubbing before rinsing everything off with warm water.
Once done, put everything back together and give your faucet a test run! With any luck, you should now have restored full pressure – congratulations on taking care of another plumbing job!
5. Replacing The Water Pressure Regulator
In the continuing effort to fix low water pressure in your home, we’re now on step five: replacing the water pressure regulator. This is a critical step that can sometimes resolve the issue, so it’s important to take our time and do it right.
Replacing the water pressure regulator requires disconnecting the existing one from both the hot and cold water supply lines. You’ll need pliers for this process, as well as a wrench if your regulator has a union nut connected to it. Once you’ve disconnected the old regulator, make sure you clean up any debris or sediment before installing the new one.
Once your new regulator is installed, turn the valves back on and test out your newly-improved water pressure. If all goes according to plan, you should notice an immediate difference! And with that, we’ve successfully fixed our low water pressure problem - congratulations!
6. Inspecting The Water Supply Line
Ah, the dreaded problem of low water pressure. It can be so frustrating to stand in your shower and not have the soothing stream of water you need to wake up and start your day.
It's time to tackle the next step in plumbing 101: inspecting the water supply line. This is a key part of finding out why you're experiencing low water pressure, as it will tell us whether there is an issue with the actual line bringing water into your home.
Allusion: Visualize yourself on a mission to detect the source of this problem like a detective trying to solve a mystery.
Inspecting the water supply line can be trickier than it sounds, especially if you aren't used to working with plumbing systems. Make sure you turn off the main valve going into your house before doing any inspection work. From here, you'll want to check for any leaks or blockages along the pipe that could be causing problems with your water pressure. If you find any issues with either, it could be that replacing or repairing parts of your pipe is what's needed for better flow in your home!
TIP: It's always a good idea to consult a professional plumber when dealing with plumbing issues like this one - they'll have all the right tools and expertise to help get things running smoothly again quickly and safely.
7. Replacing The Showerhead
Wow! Replacing the showerhead is definitely a huge step in fixing low water pressure. It can seem like a daunting task, but with the right supplies and a few simple steps, anyone can do it!
First, gather all your materials for the job. You'll need a wrench, a new showerhead, screwdriver and some plumber's tape. Oh yeah, don't forget to turn off the water supply before you begin! Now that everything is ready, let's get started.
When replacing the showerhead, start by removing the old one with your wrench. Unscrew it from the wall until it comes loose and then carefully pull it out of the wall cavity. Don't forget to save any parts that come off; they may be needed when putting in your new one! Next up is wrapping thread seal tape around the threaded part of your new shower head. This helps ensure a tight seal against leaks in the future. Finally, screw on your new shower head tightly using your wrench and you're done!
It might seem intimidating at first but replacing your showerhead is actually quite easy when you have all of your supplies ready and know what steps to follow. With this knowledge under your belt, you're now prepared to tackle any low water pressure problems that may arise in the future!
8. Adjusting The Water Valve
After getting those pesky showerhead issues sorted out, the next step in plumbing 101 is adjusting the water valve. Taking on this task can be intimidating at first, but with a few simple steps and a lot of patience you can get it done in no time.
Let's start by taking a deep breath - figuratively speaking! It doesn't have to be as overwhelming as it looks. Think of it like this: you're about to experience total control over your water flow. That alone should give you an extra boost of motivation!
The first thing you'll need to do is to locate the main shut-off valve for your water supply. A little bit of research will help here - either through your own investigation or consulting with an expert. From there, you'll want to take your wrench and turn the knob clockwise until it's completely closed off. This will prevent any unexpected bursts while you work on making adjustments.
Now comes the fun part: gradually turning it counterclockwise until you find that sweet spot where your water pressure flows just right (just don't go overboard!). Keep in mind that the tighter you close it, the higher your pressure will be and vice versa. And voila! You've successfully adjusted your water valve without breaking a sweat - well done!
9. Installing A Pressure Booster System
So, we've made it to the last step in fixing our low water pressure issue: installing a pressure booster system. This is an important step that can make all the difference when it comes to ensuring that you have great water pressure throughout your home. It's not something that everyone will need to do, but it can be a very useful tool for those who have stubbornly low water pressure.
Before I get into the specifics of how to install a pressure booster system, let's talk about what one actually is. A pressure booster system is basically a pump and control valve combination that helps increase the water pressure in your home. It works by monitoring the incoming water pressure and adjusting it accordingly to ensure that you get the best possible results.
Now, let's look at how to install one of these systems in your home. Here are some of the steps you'll need to take:
- Tools & Supplies:
- Plumbing tools (wrenches, pipe cutters)
- Pressure booster system components (pump, control valve, mounting brackets)
- Fittings & connectors (elbows, unions)
- Installation:
- Select an appropriate location for installation (near a water line).
- Connect the necessary piping according to manufacturer instructions.
- Connect electrical power supply and set up control valve as needed.
- Testing & Adjusting:
- Turn on the power and check for proper operation.
- Make adjustments as needed based on desired performance results.
With these steps taken care of, you should now be able to enjoy improved water pressure throughout your home! Keep in mind that this is just one way of improving your water pressure; there are plenty of other options out there depending on your specific needs and preferences. So make sure you do your research before making any decisions!
10. Troubleshooting Other Causes Of Low Water Pressure
So, we've made it to the last step in our plumbing 101 guide: troubleshooting other causes of low water pressure. As we all know, there could be any number of reasons why our water pressure is low. We could have a blockage in the pipes, an old tap washer, or even a faulty valve. So now it's time to get down to the root cause and fix it!
The first thing I'd recommend doing is checking the main water supply valve. This valve is usually located near your front door and should be fully open. If your main water supply valve isn't wide open, this could be causing a severe drop in pressure. To fix this issue, simply turn the valve fully counterclockwise until it's completely open.
Next up is checking for any blockages in the pipes. If there are any blockages or build-up of sediment in the pipes, this can reduce the amount of water flowing through them and ultimately lead to lower pressure levels. To check for blockages, you'll need to disconnect any hoses from taps or appliances and run some hot water through them to see if anything comes out - if nothing does then there may be a problem with your pipes that needs addressing!
So hopefully by now you should have identified and fixed any issues with your plumbing system that might be causing low water pressure - but if not then it's time to call in an expert plumber who can take a look at what's going on and get everything back to normal for you!
Conclusion
The journey of plumbing can be difficult and overwhelming, but with a few simple steps, you can fix low water pressure. Just like with all other challenges we face in life, having the right tools and knowledge to tackle the issue is key. As we have seen with our plumbing journey, understanding the root cause of the problem was essential for properly resolving it.
We started by identifying and diagnosing the issue, then moved on to checking for any leaks. After that, we cleaned the aerator and replaced the water pressure regulator. We also replaced the showerhead and adjusted the water valve before finally installing a pressure booster system or troubleshooting any other causes of low water pressure.
If this article was an allegory for life’s challenges, it would serve as a reminder that even though challenges can seem daunting and overwhelming at first glance, with patience and hard work they can be overcome. So don't be afraid to face your problems head-on; take a deep breath and trust in your own abilities to find a solution!
via Kellys Home Plumbing Tips kellymonderhomeplumbing.blo...